Installing Google Tag Manager
Installing Google Tag Manager
Create Account
Create a free account or login here: https://tagmanager.google.com/

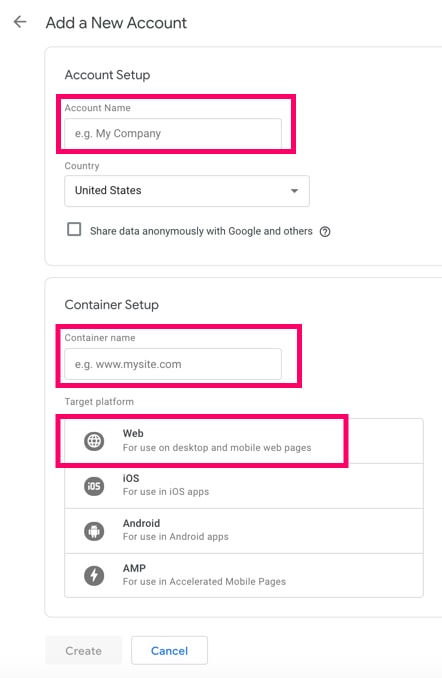
Create an account and a container for the website that needs GTM.
- Account Name: Add the company name here. This is just a name that will used so that you can easily locate the account in GTM.
- Container Name: Add the domain name here. This is just a name that will used so that you can easily locate the account in GTM.
- Target Platform: Choose “Web” if you are adding GTM to a website.

Click “Create” when you are done.
Next, you have to agree to “Google Tag Manager Terms of Service Agreement” if you want to continue.
Tracking Code
Now you need to add the Google Tag Manager tracking code to the website.
Log into the website. Copy and paste the two pieces of code in the <head> and the <body> sections of the site on all pages. Here’s a tutorial if you don’t know how to do this.

Testing the Installation
You’ll need a Chrome extension called “Google Tag Assistant“.
Visit any page on the site that you added GTM to. Click on Google Tag Assistant and select “Enable”. Refresh the page. Open “Google Tag Assistant” again and see if you can see the Google Tag Manager container load.

You’ll also notice a color next to the Google Tag Manager result in Google Tag Assistant. If you have just installed GTM for the first time on a site and have not set up any tags or triggers, the container is considered empyy and will return a yellow icon. Here’s what all the colors mean:
- A grey icon with an ‘x’ indicates that no code was found on the page
- A green indicator will show if a valid tag was found. The number in the icon indicates the number of tags that were found
- A blue indicator will show there are suggestions on improving overall tagging health
- A yellow indicator will show that a tag was found with minor implementation issues
- A red indicator will show that a tag was found with critical implementation issues
Reference: https://support.google.com/tagassistant/answer/2947093?hl=en
